How to Screen Record Netflix without Black Screen
Are you ready to take your Netflix bingeing up a notch? Screen recording Netflix is an easy way to share your favorite episodes with friends and family, or even just capture those perfect movie moments for yourself. But when it comes to streaming video content, there's one unpredictable issue that can stand in the way of success - the dreaded black screen! Running a standard screen record command will result in nothing more than a blank display instead of their desired show, which can be incredibly frustrating. But don't fret, because we have the solution: discover how you can avoid the dreaded Netflix black screen effect and get perfect Netflix recordings every time!
1. Why Do We Get A Black Screen?
When you try to screen record Netflix, you may encounter a black screen due to several reasons. Netflix employs Digital Rights Management (DRM) technologies to protect their content from unauthorized copying or distribution. Here are a few reasons why you might experience a black screen when recording Netflix:
>> HDCP protection: Netflix uses High-bandwidth Digital Content Protection (HDCP) to prevent unauthorized recording of their content. HDCP encrypts the video signal during transmission and requires a compatible device, such as a monitor or TV, to decrypt and display the content. If your screen recording software or hardware is not HDCP-compliant, it will result in a black screen.
>> Protected video path: Some devices and operating systems implement a "protected video path" that prevents screen recording of certain content. This technology aims to block any attempts to capture the screen output of protected content, including Netflix videos.
>> Browser restrictions: Netflix has implemented specific restrictions on certain browsers to prevent screen recording. For example, Google Chrome has a built-in feature that detects screen recording attempts and displays a black screen to protect copyrighted content.
>> Hardware acceleration: Enabling hardware acceleration in your browser or graphics settings can sometimes interfere with screen recording. This can result in a black screen when trying to record Netflix.
So, to get rid of this issue, you need to do some settings on your computer and turn to the right tool.
2. Alternative Way to Make Netflix Recordings
Apart from trying some recording tools, you can use Netflix downloader to download your favorite titles and keep them on devices. The benefits of downloading include faster and more reliable access to high-quality content, and no need to wait for the content to play out in real-time. Here we recommend FlixiCam, it is an excellent video downloader that can help Netflix subscribers (no matter with an ad-supported plan or ad-free one) to download their favorite titles on Windows and Mac computers as MP4 or MKV files.
After downloading, you can keep them on your devices and play them anytime anywhere. The video quality is up to 1080P and multilingual audio tracks, subtitles will be well preserved as well.
How to Use FlixiCam
Step 1. Run the program abd log into your Netflix account by entering any word in the search box to open the Netflix login window.
Step 2. Tap the Setting icon on the upper right corner to select the output settings.

Step 3. Search video by entering keywords or the videos link copied from Netflix webiste.
Step 4. If you are trying to download a TV show, now simply click the Download icon, followed that a window will pop up allowing you to select titles as well as seasons, and to choose audio track and subtitles by clicking "Advanced Download" in the bottom left corner. If you try to download a movie, please click the "Advanced Download" icon beside "Download" to open the window.
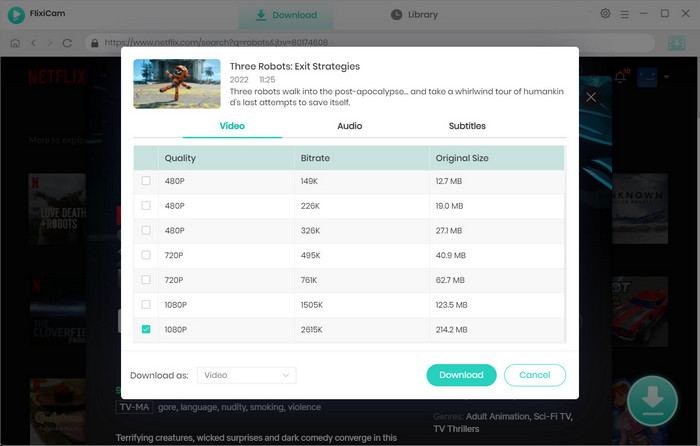
Step 5. Click on "Download", then the program will start downloading the Netflix videos to the output folder.
3. Free Way to Screen Record Netflix on Computers (100% Working)
To record Netflix on PC, you need to get a reliable tool, it would be best if it is free as well. OBS Studio is such a powerful and versatile open-source software that is widely used by content creators, professional streamers, and even businesses to record, live stream, and present their content to the world. This free application allows users to capture high-quality footage from their desktop or other sources, seamlessly switch between different scenes and sources, and add various customizable settings and filters to enhance the presentation. Whether you want to create gaming videos, webinars, podcasts, or live events, OBS Studio provides users with the flexibility and features they need to produce professional-level content with ease. Here is how to use this tool on Windows PC.
How to Use OBS Studio
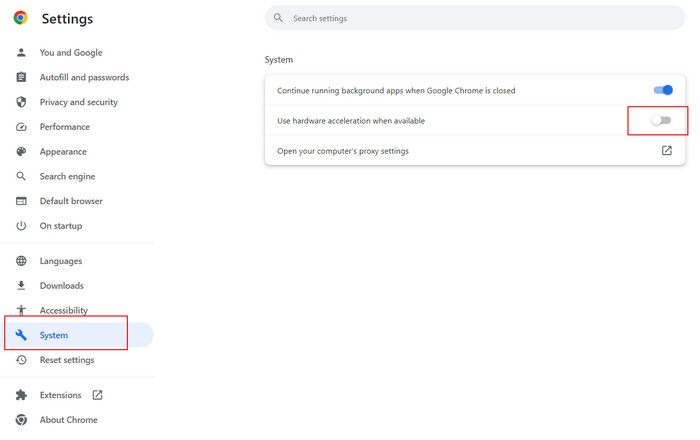
Step 1. Turn Off Hardware Acceleration: Before you get started, the most important step is to go to the Settings of your browser and turn off hardware acceleration, otherwise you will get a black screen recording.
For Chrome, simply click "┇" > "Settings" > "System" and disable the option - "Use hardware acceleration when available", then relaunch your browser.
Step 2. Install OBS Studio: Download and install OBS Studio from the official website (https://obsproject.com/download). It is available for Windows, Mac, and Linux. After installation, please launch it.
Step 3. Create a new scene: Click on the "+" button under the "Source" section and choose “Display Capture”. Then name it accordingly. The "Properties" window will pop up, here you can set the "Capture Method" as Windows 10, "Display" as your primary monitor, and uncheck the box of "Capture Cursor" as needed.
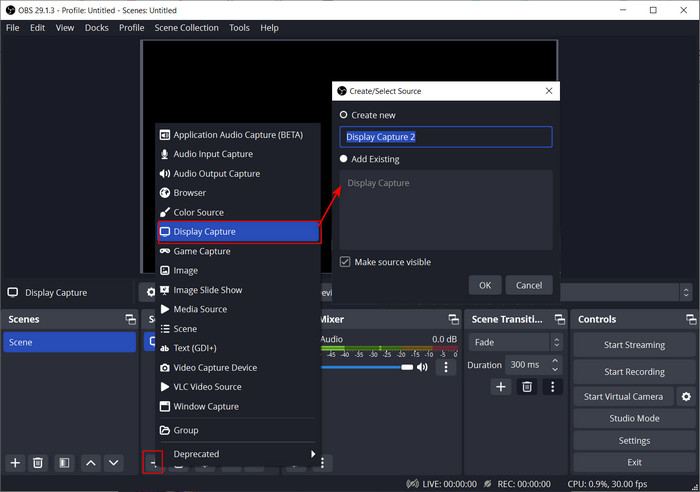
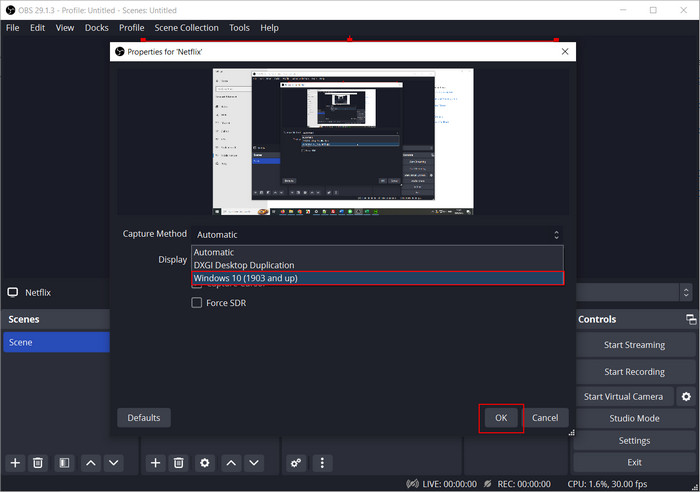
Step 4. Start recording: Go back to OBS Studio and click on the "Start Recording" button to begin recording. Play the Netflix content in the browser source window, and OBS Studio will capture the playback. When you're done recording, click on the "Stop Recording" button in OBS Studio.
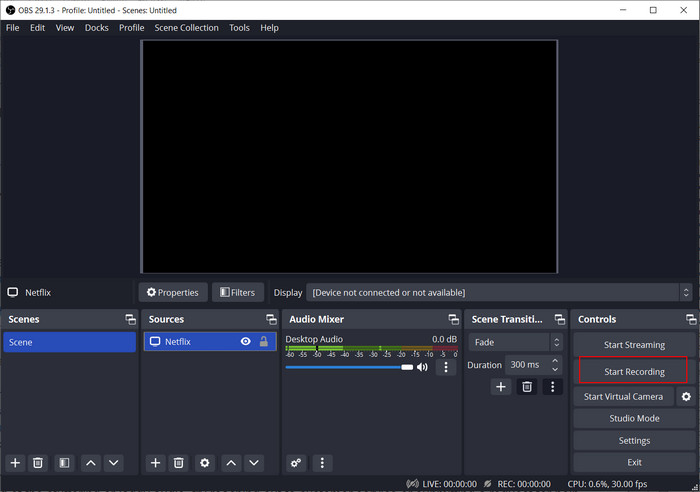
This is the most straightforward process to use OBS Studio to record video. In addition, you can go to the setting window by clicking “Settings” at the right-bottom to change the output path and adjust other output settings.
- Windows
- DirectX 10.1 compatible GPU
- Windows 10, or Windows 11
- macOS
- Intel or Apple Silicon CPU
- OpenGL 3.3-compatible GPU
- macOS 11 ("Big Sur") or later
- Linux/Unix
- OpenGL 3.3-compatible GPU
- X window system or Wayland
For more details, you can go to its help center: https://obsproject.com/kb/category/1
If you don’t mind spend some penny on recording tools, then you can also try PlayOn, Audials Movie, AnyStream. They all supports to record content from not only Netflix, but also Amazon, Disney+, and more. It can output MP4 or MKV files, keep HD quality, subtitles, audio tracks in different languages, and so on.
Conclusion
To conclude, we list several reasons for black screen issues, you can follow them to make a check. If you use OBS Studio to record Netflix but get a blank screen rather than the desired video, then simply disable the hardware acceleration on Chrome or Firefox. If you are looking for an alternative way to fast save your downloads on your devices, then never miss FlixiCam. It allows you to download any movie, show, or documentary from Netflix as local files. The downloads never expire.
 Download Win
 Download Mac